Check the size of it here in this picture. The Butterfly Bush behind it looks really big in comparison.
  Now look at it, the Butterfly Bush doesn't stand a chance! I had to trim back three or four feet just so we could get up the steps. The picture does not do it justice. The flowers are beautiful. It has taken over the whole garden. We are going to encourage it to grow more and scatter the seeds all over. It is a really good way to discourage the weeds. Kevin split open the thick leaves to show his dad the base of the plant and look below what is hiding in there.
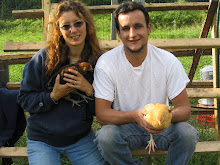
 Our beautiful Polish Crested chicken!
 She is hiding her head because she thinks I can't see her. He moved the chicken to try and shoo her away but she has about 20 eggs under her and we have no idea how long she has been sitting on them. We will let her go and see if any hatch. I hope they do, it will be really fun to watch them. We have three of this breed and two of them are so broody. The other broody one has been sitting in a nesting box all summer, to no avail because I take the eggs every day.
 Here is our other flower explosion. What started out as a few day lily starts has turned into huge plants. I like the background so much better! A chicken house instead of a pool.
  I'm going to cut the flower tops off soon. I'd rather be able to see the rock and the trellis instead of the flowers. Kevin wanted me to wait because there are still so many buds but it looks too messy to me. I'll put a before and after when I do it.
 Here is the trellis I want a clear view of. It has a passion vine on it that we transplanted a few weeks ago and it is getting ready to bloom already. They are such fast growers. I hope it has time to fill in a little. I have been waiting since last year to transplant this. I finally found a really reasonably priced trellis, only about $20.00 so we finally transplanted it.
 Here are my sweet water lilys. Not a very good picture though, the camera wanted to focus on the cattails and not the lilys. When I was in Sugarcreek (Amish Country) a couple weeks ago I picked up three Amurs for our pond. (Grass eating carp if you didn't know) I was really worried about them eating my lilys but the lady at the fish hatchery said that the lilys are probably not hardy and won't make it through the winter anyway. They look nothing like anything we had in our lake when we were growing up so she may be right.
When we in Sugarcreek I found this really well made napkin holder. There is an Amish family that makes these and the kids sign and date them. Really cute don't ya think?

I also found this awesome buzzard to put by my pond.

Pretty creepy don't ya think. I love him!
While online looking for ways to water the food eating, water drinking demons that they call meat birds, Kevin found this amazing Bell Waterer. He ran a garden hose from our pond and it works great. It's a low pressure kind of thing that uses gravity to get water.

 You can see the hose coming down the bank from the pond. We had to get the birds away from the house cause they are pretty stinky and ruin grass pretty fast. We really should move them a couple times a day but it's too much, working 10 hours a day. We do move them more on the weekends though.
 Here is my garden, all of it! Only one plant survived, all the rest were scratched up by the escapee chickens. I didn't have very much to start with though. There is a tomato with two leaves left on it but I'm sure it's days are numbered. I only have this one extra fence section.
 We had a birthday party for the youngest yesterday, 10 years old! Lots of Hannah Montana and pink stuff. We found this ice cream maker and I made frozen custard. Loved it!
 I'm such a loser, I had to wrap her presents in used gift bags (they looked new though) and had to turn Christmas paper inside out for the big one. I covered it all up in a bunch of bows, girls love bows! We got her a Ladderball game (aka Hillybilly Golf) and Kevin, me, the youngest and her big brother played it all day today. She was at her Grandpa Mikes for the Fourth of July and played it there and loved it. She said she rocked at it. That was great but she and I were on a team and let's just say that neither of us rocked at it. The guys beat us two games to one. We will get our revenge though.
If any ones feeling bad about the heat take a look at this and be happy!
Til next time,
stay cool!
Beth


 As soon as we put down the straw Cleo moved right in. It was so cute, she just layed right down and didn't want to leave.
 Mr. Turkey, also known as "my buddy" (he is the one in the video that pecks me!) hopped right up on the new perches, he is so nosy. Always in the middle of everything. We made the perches out of some small trees that we had cut down. You can also see the two heat lamps, one for daytime and another with a red colored bulb for at night.


 Here we are the day we moved the chickens in! My sister, Amy and the girls and I moved them from the barn to the chicken house after her husband helped Kevin put the fence up. (We don't put pictures of the kids in but one of them took this picture of us.) All went well until the last batch and Amy tripped going into the doorway. She was carring a large wire cage with a fie or six chickens and I had one under each arm. She saved the chickens instead of herself and hurt her leg really bad. Below is a picture of the damage.


 The picture above shows a piece of it. It was kinda


 OK, we went out and here is a picture of the finished roof. But guess what, there is snow all over it and you can't see a thing.


 I held the largest


 Here he is attaching the roof trusses... trusses?... yeah, I guess that is what they are called. He left the sides rough and he cut them off with a chain saw after he had the correct roof line.

 You can see our back deck in this picture. As soon as it warms up we will be sitting here every spare moment. We used to sit and watch the kids swim but now we watch kids play with chickens. As you can see, the house need painted and a new roof really bad. You may not be able to see but there is a large cooking pot over one of the old vent pipes in the roof. There is also a coffee cup over another small pipe. For some reason Kevin thinks we need a new roof and we also need to paint the house.